Monday, November 21, 2011

Tedious Insulation

Who did the lion's share of insulating?  Me.  Talk about tedious, but to be honest, I tend to get those jobs.  The crap jobs that require little skill, no know-how, and a lot of lifting.  Luckily, the insulation wasn't heavy, but unfortunately, it was thin.  For one reason or another we couldn't order the fancy Rmax insulation in a 2 or 3 inch thickness, and if I remember correctly, those sizes are only available on the west coast.  Shla!  So before I start bragging about how I cut and insulated the house mostly by myself, let me explain why that is so impressive.  The reason being that I used 1/2 inch thick Rmax, the only thing available, and that means 5 layers of insulation needed to fill the walls.  Five.  Not only is our house longer, but for some reason (I'm still not sure why) we added twice as many rafters, these factors only adding to the monotonous chore that is insulating. 

That goon.

Notice above, my loving husband, smiling as if he did all the work.  Sniff.
And below, just showing off more of my work.

Where future TV/closets will go.
The next few photos are a look into the bathroom.

Tiny bathroom door.

Where future toilet will go.

Shower stall.

Shower drain.

Friday, November 18, 2011

Pipes and Wires

It is now safe to say that the guts of our house are finished.  Finished.  Finito.  Done.  Steve gets credit for the lion's share of these jobs.  He researched what he didn't already know, and sort of explained things to me as we went along.  By now, since it's been weeks since we worked on the pipes, I have forgotten most of what he said.  What I do remember is this:  The high pressure pipes are small, the drainage pipes large.  Primer is purple, high pressure glue is orange, and drainage glue green (though really it's clear).  As you might have already guessed my only real job was to glue and prime, which suited me just fine because Steve did a good job threading the pipes through the studs.  I particularly disliked that part because it felt wrong to drill holes through the house... like unmaking our hard work.  
Below is a picture of the high pressure pipes as they go toward the sink, hot water heater, and outside connection. 


Kitchen pipes.

My dad, Paul, started the electrical work, putting in most of the boxes, and after he left my brother-in-law, Paul, did everything else.  He did explain how electricy works, though the idea of it still seemed a little like magic, that is, until we had to thread a ton of wires through our house.  More holes in the wall, a pain to insulate around, and so complicated that it dispelled the magical feel entirely.  This is not to say that wiring was difficult, no, Paul seemed to have it all under control.  But Steve and I seemed to always need just one more outlet, another light fixture, or something we merely overlooked, so the wiring took a while.
I've added a few pictures, including: one outlet, two switches, and a light fixture.
Oh, and P.S. the wires are yellow, something else I learned.

Outlet.

Dual Switch.

Porch Light Fixture.

We ended up using black iron for the gas pipes (which is what you are supposed to use).  I fancied copper, first for water pipes and when that idea didn't fly, for gas.  I don't know why, I just like copper, but sadly we ended up using very little, and only on the appliance connections.
So what did I learn about the gas pipes?  Pink tape is wrapped around the thread, and the glue is globby yellow.  Yes, I administered this as well.  It was a bit frightening when all is said and done that perhaps we messed up, did something wrong.  When you buy a house you don't worry if it's got a gas leak, but trust me, when you build it yourself, you do.  We tested the pipes first, nothing burst thank goodness!  And after that we doused the iron pipe connections with this soapy stuff (transparent blue) and waited for it to bubble.  It didn't, so celebrations were in order. 
The photo below is of the space between windows where our heater will go.  You can see the gas pipes and electrical work, all insulated and ready to be walled in.  Yay!


And finally, a picture of the kitchen with all its pipes and wires, something of a mess really.  Just out of frame is the little gray breaker box for our circuits, and it is the last thing that needs work.  You can see the wire dangling out, waiting to be... hooked up or something.


The drainage pipes are easy to overlook, literally, since they are under the house.  I forgot to take pictures and had to run outside to do so.  So here they are!


Under toilet.


Under shower.


Under sink.

The drainage pipes were difficult, like putting together a puzzle without the box cover for help.  And once we finished we noticed that they hung crookedy and had to go back and fix it all.  Blerg.  But it was for the best, they turned out nicely, or however nice drainage pipes can be.

Wednesday, September 14, 2011

Stairway to Heaven, Doorway from Hell

It has been a long time since I've updated, and while the blog remained stagnant, progress on the house did not.  Okay, well, maybe for a little while it did, but in our defence--it was summer.  So looking back, what do I have to say about the stairs?  That only an idiot waits as long as we did to make them.  Seriously. 


They were pretty easy to make, and pretty when finished.  I honestly don't know why we put it off.


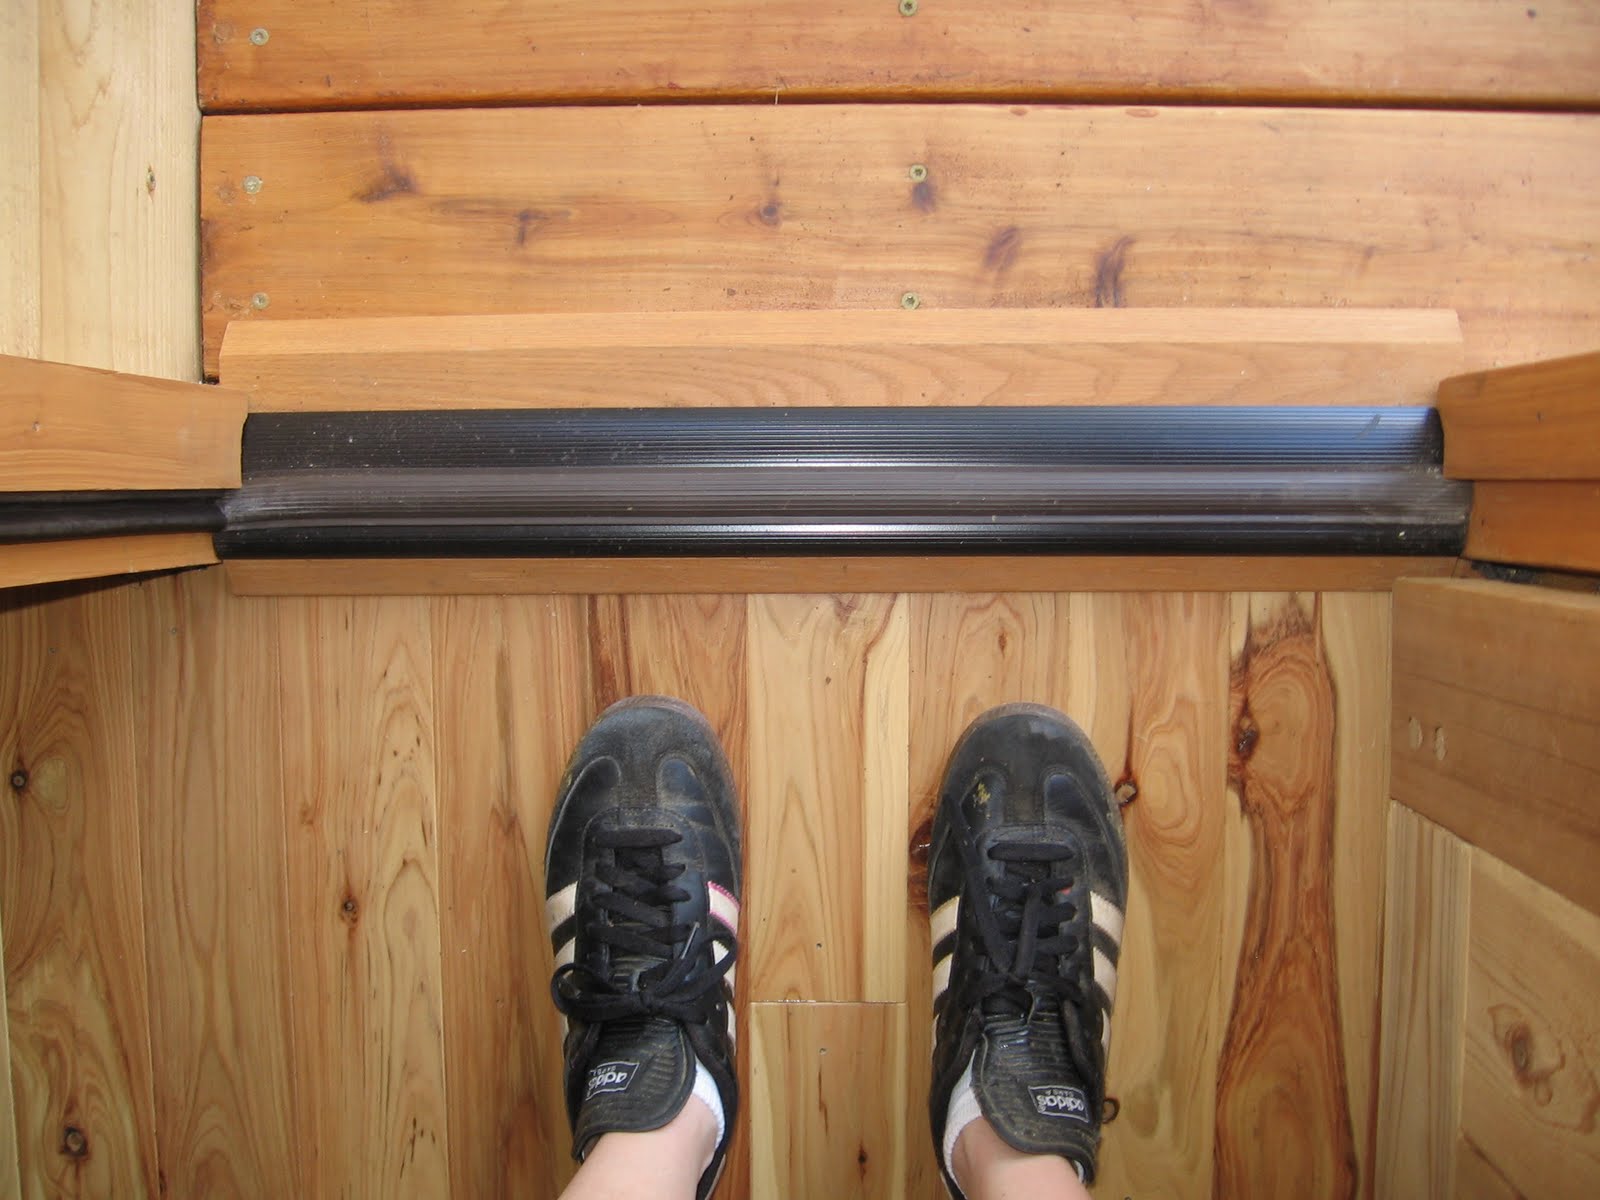
On the other hand, I know exactly why we put off making the door.  It was hard, really hard.  First came the threshold, this wasn't difficult so much as time consuming.  The final product is actually three thresholds combined to make one, as you can see below.


The demaraction between hardwood floor and porch didn't line up with where the door should hang, so we had to make the threshold wider, hence the three.  The wood you see on the bottom is actually two pieces combined, and the metal/rubber one on top is used just to cover it up and make everything look nice.


To be honest, I don't even want to write about the door.  Just rehashing all the issues for this entry is enough to send me running for my aspirin.  You see, the problem is that doors are very complicated, and meant to be built by professionals.  With no professionals available, Steve did most the research and all the work.  From what little I know, you aren't supposed to create a door from solid wood because it is more likely to warp.  But shaving down two pieces of cedar and fitting them together (not to mention around a window) was next to impossible.  So we just didn't.  Instead, using a multitude of tools, Steve created the joints from solid cedar.  We figured that if the door did warp, then we'd just fix it.  Having already built a little house, a few home repairs seem easy.


We used wood glue and clamps to hold everything together while it dried.


Using brads, we added a little frame around the window on both sides of the door, just in case the glue and pressure aren't enough.  Plus, it just looks nice.  Before the knob and lock we had to sand a lot--glue is messy.  And then the real nightmare began.  Nothing wanted to line up right.  First was trying to get the door hardware to fit with the frame, which it didn't at first, or second.  And don't get me started on trying to hang the blasted thing!  It took a week of tinkering, and at some point we got frustrated and thought sanding the door down might help it fit better.  Stupid.  We made the door to fill the frame, so shaving it down wasn't a good idea.  So now there are some gaps, which concern me more than Steve, as I'm extremly paranoid about bugs.  But I guess that's what weather stripping is for.   


I thought it turned out nice for all its flaws and imperfections.


Friday, July 22, 2011

Pictures Update

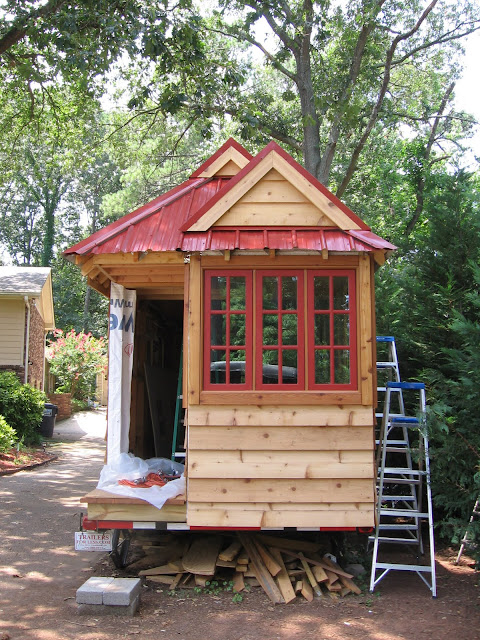
We finished the siding, but I never added pictures.  So this is where we're at on the exterior of our house.  It might look good, but it's still far from being done.  You'll notice the corners need to be covered over, the house hasn't been stained, and a ton of other touch up work.  But for now we're moving on to the interior, focusing on plumbing, finishing electric, and... other stuff.  I'm not exactly sure about the other stuff, but I'm sure I'll figure it out as we go.


Thursday, July 21, 2011

What to Expect When You're Expecting

My dad (Paul) was working with the electrical aspect of our house while he was visiting.  After he left my brother in law (Paul) continued this work.  Having no knowledge on the topic, I began to ask Paul (my brother in law) some basic questions about wiring.  A few questions turned out to be quite embarrasing as I had to admit that, like telephones, I'd always assumed electricity was run by magic.  It seemed that our squater friend would agree, seeing as she built her home much the same way as Steve and I, with bright yellow wires running through the walls.  


Yes, those are eggs.  At least she's paying us rent.

Wednesday, July 20, 2011

A Little Bit of Frill

A lot of sprucing the last few weeks.  Steve's parents started most of these projects.  First was the cedar trim around the roof, then the cedar 2 x 4s that hug each window.  Trimming the windows wasn't necessary, ours came with a wood frame already.  But at the time I was so caught up in doing everything just so, thinking the house might fall to pieces if I diverged too far from Jay's fencl.  Now I'm glad we went the extra mile with the windows, they look better for it.
Not much to say about the siding.  It's 10 inch beveled cedar, and putting it up was one of the few jobs I really enjoyed.  Okay, maybe enjoyed is too strong a word, but it didn't drive me to the throwing things and stroming off kind of crazy stage, which the house can easily do.


Cedar trim and siding


Close up of cedar trim and siding

Trying to attach the red roofing to the front of the house is an epic story in and of itself.  I've mentioned before that the peaks are not a facade, but the actual frame.  While this gives us more room and looks great on the inside, it was a nightmare to work with.  Because it's not a facade the angles didn't line up at first, so there was much tinkering and numerous bouts of that crazy phase I mentioned before.  Below is a picture taken during this hellish process, don't be fooled by the simplicity of it.  Getting those few pieces of roofing cut just right took weeks.


Nightmare.

Again, the roof caused problems when it was time to add the decorative cedar.  That's when we realized that Jay had planned ahead, and we had not.  We made toglike blocks of wood to hold the trim away from the siding.  And after that we had to be even more inventive with the roofing we had, creating edging and peaks from pieces that were never meant to be either.  See!


Steve attaching said toglike blocks

Below is a picture of Steve's bay window in all of its glory.  The sashes are held together by white pine, as to match the white pine walls that will (hopefully) eventually be inside.  I slathered on a few coats of semitransparent cedar goo to keep the wood from weathering.


Painted bay window

So the siding is complete, though the exterior is far from finished. 


Thursday, June 30, 2011

Down, Goes the Floor

The most difficult and time consuming part of installing the hardwood floor, was trying to get the right tools.  We rented a super big and scary machine that snaps the nails down at an angle, but for reasons I'm less than thrilled to go into, it didn't work.  We wasted time trying staples instead of nails, before finally giving up and nailing it down by hand, old school.  The space is so small, it really didn't take that long.  And if we'd spent our time doing it that way from the begginging, instead of searching for the best equipment, than we would have finished much sooner.  But isn't that just the way.
We used Australian Cypress from Lumber Liquidators, after ordering, receiving, and changing our mind about some bamboo.  Lumber Liquidators was great though, and made the exchange for us, no charge.  I would definitely recommend buying your hardwood floor from them.
Halfway through the installation process

Still just halfway through the installation process

The floor looks amazing, but its hard to convey that through a camera.  This next picture is the best I can do, and even so, the real floor looks way better in person.  I promise.


Close up