Wednesday, February 15, 2012

The Fun of Furnishing

You might not believe me, but I'm telling the truth when I say that we just don't have enough furniture.  After spending a lot, and I mean a lot, of time surfing the internet for just the right stuff, I chose two sofa chairs that fit together in the bay window area like an armless loveseat and a kitchen table/cart thingy that folds into itself with more gusto than a transformer.  My goal was to buy the practical things we'd need while using up minimal space, but I exceeded my expectations...
So after constructing that table and chairs (none came assembled) I cleaned up the house to take a few pictures.  That's when I realized how empty the house feels.  After working around piles of wood, boxed appliances, and a hodgepodge of tools for months on end it's odd to just... walk around.  I don't have to constantly shift things to work or step over piles.  Honestly, it feels big.  I know you don't believe me, but Steve agrees, and he hardly ever lies.
So I took a bunch of pretty pictures below.  And in case you already forgot, I assembled the furniture.  (By myself)  We've owned alot of IKEA furniture in the past and usually I either get frustrated putting it together or mess it up, in both cases Steve takes over.  But not this time.  After building an entire house, putting together some furniture didn't seem so difficult, and I really enjoy finishing a project on my own, collecting the accomplishments like a magpie.


I can't wait until the house is finished just so I can shred these pants.  There are more holes you can't even see in this picture, and you don't even want to know where they are located.


See, it's big.  We already got rid of most of our stuff, so I'm not sure how we're going to make it feel less... echo-y.  I suppose this isn't the worst problem one could have.


Tuesday, February 14, 2012

Privacy in Place

With the walls varnished, we could finally install blinds, outlet covers, appliances, etc.  We've still got some work ahead of us, but the blinds are finished!  I'm pretty excited to see it all coming together, every day it looks more and more like a real house.  Erm, Steve is excited too...


Here is one of the windows in the kitchen, a symmetrical masterpiece:


The bathroom gets autonomy, needing a different sort of light fixture and blind.  We made the mistake of making the wood frame around the window after ordering the blinds, so it was the wrong size and we had to order another.  A stupid mistake, but I guess that's the only kind there is.


Monday, February 13, 2012

Varnish: the Necessary Evil

I thought varnishing the inside of the house would be difficult, so I wasted a lot of time dreading the inevitable.  We finished putting up the trim, I forgot to take pictures as we went, but you'll notice it around the windows and door, not to mention molding along the floor, in the corners, and over the unsightly panel seams.  With everything in place there wasn't a reason to procrastinate any longer.  Luckily the job wasn't so bad, mostly because Steve's parents--John and Brenda--helped.  And by 'helped' I mean slaved away for hours.  Pictures of their contribution below.


Brenda
John

We used tung oil.  I was pleased with it because it didn't smell too overwhelming, nor did it change the color of the wood.  Apparently there are a lot of different products to protect your wood, and perhaps the reason I felt the project so overwhelming was simply because at first I wasn't sure we picked the right one.  Not to mention Steve was convinced we'd need five coats to keep our wood from turning yellow over time, and between each coat the whole house would need a good bristly scrub.  Well it got a scrub, I missed the whole thing, but the house only got two coats of varnish, and somewhere along the line me and Steve decided two was good.  Call us lazy, I don't care.

Friday, February 10, 2012

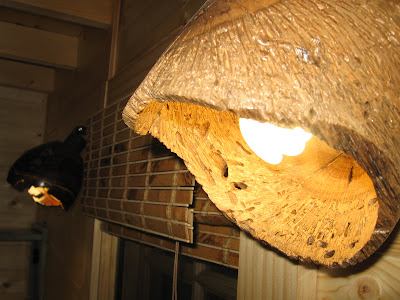
Bowl Lighting

When it was time to buy lights, Steve and I couldn't find anything we liked.  Our first inclination was recessed lighting, it's nice and subtle, meshing with the clean cabin feel.  But we soon found the idea wasn't practical, as any recessed light worth the hassle needs, like, five feet of space to hide in.  Okay, that's an exaggeration, but the point is our walls weren't thick enough, much to our dismay.  So we went back to searching for the perfect lights.  I found it unfortunate that when you type in 'cabin lighting' on google, the only result is a variety of antler chandeliers, and, well, I had a hard time getting into that.  What was fortunate is that I had a stroke of genius--not like the miniature clawfoot tub idea, but better, not to mention realistic. 
Actually... as I'm writing this, I just remembered it wasn't my idea at all, but a website I found about creating your own lights from wooden bowls.  Sad.  I just deflated my own tires.  Well okay, it may not be my idea, but I found it because I launched an extremly thorough investigation on wooden lamps, which should count for something.  So anyway, I went to Etsy.com (and if you don't know what it is you should start buying christmas gifts there asap) and bought a bunch of pretty bowls. 
The rest is pretty much history.  When the time came we used pendant lamp kits for the three hanging lights in our living room.  I made a small 'chandelier' with the same kits to hang in the bay window area.  Two (the least exciting) bowls have been banished to the lofts, I didn't bother taking pictures because they won't wow you anyway.  Two for the kitchen, one of those is my personal fav.  And the bathroom light as an afterthought, obviously I didn't use wood, that would clash, so we went simple. 
Behold, and be amazed!


Kitchen Light


The other kitchen light.  My Favorite.


The living room lights.


Bay Window Light


Bathroom Light

Wednesday, February 8, 2012

The Pretty Innards

With the outside of the house all but done it was time to focus on the inside again, namely on shelving, closets, counters, and cabinets.  Building these was extremly satisfying, much like when we did the house's frame, but the project was not without frustration...  After borrowing a truck and hauling the large sheets of fancy-shmancy plywood home we realized (after a few hours of trying) that we couldn't cut it.  The wood was too large and unwieldly for the table saw, while the skil saw didn't cut in clean, straight lines, and the jig saw didn't have the power, puttering out early on.  We know because we tried them all, and then tried them again when we thought we were clever enough to come up with a new scheme.  Well, we weren't, and nothing worked.  So we had to borrow the truck again, drive the sheets back to Lowes where they used a giant robot thing to cut our wood and show us the stupidity of our stuborness in not coming sooner, which was mostly my fault because Steve offered the solution but I said no.  Moral of the story--'Don't try this at home kids.'  But after that things were chugging right along, and we assemebled our shelves in no time.

Shelves

After screwing the shelves snugly in place it was time to add the closet.  I don't really need to wax poetic about this, aside from introducing the next pictures, there's not much to say.  The next pictures:


So we built the frame, next we just had to add the doors, which we made from the supplies we had available--wall panels, molding, and wood screws.  It took a little coaxing, but turned out surprisingly well. 

Closet

As you can see, we added rods in both the top and bottom closet, and finished things off by including a removable partition between the two.  See:


Out.

In.


So the shelves are done, the closet is finished, all secured in place, the next thing to do is build the loft shelves.  I like building squares and rectangles, it might sound elementary, but it's true.  Anytime you add triangles, with all their odd angles, to the mix you're asking for trouble.  So, as you might have guessed, the loft shelving became a two day affair.  But as always, we shlogged along until we finished. 


Loft Shelving.
 I've seen variations on the next part, but Steve and I (well, I) decided that instead of filling the space between the kitchen and living room with mirrored, shallow shelves, we'd replace one side with a ladder.  Building the ladder was no picnic, lots of angles, making the shelf look like a breeze in comparison.  Pictures below.

Ladder
Shallow Shelves

Here is a picture of the finished product.  The shelves and closet finished, loft shelving covered over, and the ladder and shelf screwed in place.


The biggest obstacle when working in the kitchen is thinking out our measurements in advance.  For example, we have to build the frames so they meet just so, taking into account our fridge measurements, the windows and range, how far our countertop should hang over, the additional width of the plywood, and on top of all that, avoiding pipes and the like.  


But after all that was sorted out it was a breeze, that is, until we ran out of plywood.  It was then a question of buy a whole new sheet for nearly 50 dollars, or substitute.  Well, if the wood doesn't quite match around the fridge, you know why.
The countertops are just pieces of wood we bought from the hardware store.  The one above the fridge is pale and thick, we intend to rub some butcherblock oil on it and call it done.  The other, not so pale and thick, but a rather hideous shade of yellow, will be covered over with stainless steel, so just ignore it for now. 


The cabinet doors are made the same way as the closet's, the last and final touch.  Ta-da!